
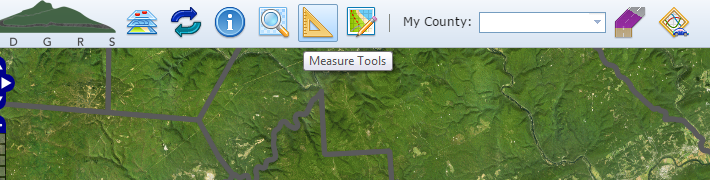
Measure Tools
Mapper includes three custom zoom tools that allow you to perform some basic length and area calculations for an area of interest. These three tools are:
- Measure Length (
 ): Calculates the length of a drawn line in miles, feet, kilometers, or meters.
 - Measure Area (
 ): Calculates the area of a drawn polygon in acres, square miles, square kilometers, square feet, or square meters.
 - Obtain Coordinates (
 ): Click on a point on the map to retrieve it’s latitude and longitude in decimal degrees or degrees/minutes/seconds.
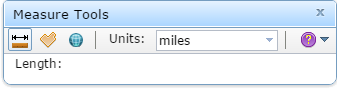
Measure Length
 Navigate and zoom to the area of interest.
- Turn on any helpful layers.
- Click the Measure Tools button to open the tools dialog.
- Click the Measure Length ( ) button. The dialog’s contents will change as shown on the right. Your cursor will change to a red square (
 ).
).  Select the units of measurement from the drop-down list. This can also be performed after drawing your measurement line.
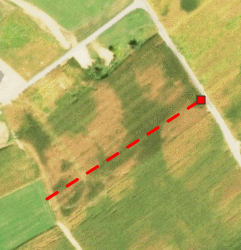
- Begin by clicking with the left mouse button at the desired start point. Then drag the mouse and single click where a direction change will take place. The drawn length will be represented by a dashed red line. Double-click the mouse when finished. This graphic is temporary and will disappear when starting a new line, selecting a different measure tool, or closing the dialog.
- The length of the drawn line will appear in the Measure Tools dialog.
Measure Area
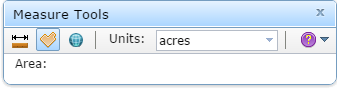 Navigate and zoom to the area of interest.
- Turn on any helpful layers.
- Click the Measure Tools button to open the tools dialog.
- Click the Measure Area ( ) button. The dialog’s contents will change as shown on the right. Your cursor will change to a red square (
 ).
).  Select the units of measurement from the drop-down list. This can also be performed after drawing your polygon.
- Begin by clicking with the left mouse button at the desired start point. Then drag the mouse and single click where a direction change will take place. The drawn area will be represented by a solid red border. Double-click the mouse when finished. This graphic is temporary and will disappear when starting a new polygon, selecting a different measure tool, or closing the dialog.
- The area of the drawn polygon will appear in the Measure Tools dialog.
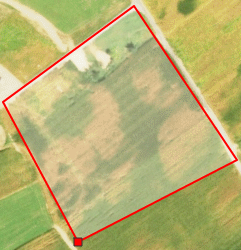
Obtain Coordinates
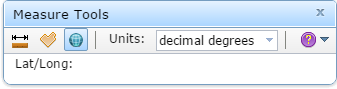 Click the Measure Tools button to open the tools dialog.
 - Click the Obtain Coordinates ( ) button. The dialog’s contents will change as shown on the right. Your cursor will change to a red square ( ).
- Select the units from the drop-down list. This can also be performed after obtaining the coordinates.
- Single click the left mouse button to obtain its coordinates. The selected point will be represented by a same red square as the cursor. This graphic is temporary and will disappear when clicking a new location, selecting a different measure tool, or closing the dialog.
- The coordinates of the selected point will appear in the Measure Tools dialog.
